Spring之实现IOC和AOP-3
3. 手写实现IOC和AOP
上⼀部分我们理解了 IoC 和 AOP 思想,我们先不考虑 Spring 是如何实现这两个思想的,此处准备了⼀个『银⾏转账』的案例,请分析该案例在代码层次有什么问题 ?分析之后使⽤我们已有知识解决这些问题(痛点)。其实这个过程我们就是在⼀步步分析并⼿写实现 IoC 和 AOP 。
3.1 银⾏转账案例界⾯

3.2 银⾏转账案例表结构
create table lagou.account |
3.3 银⾏转账案例代码调⽤关系

3.4 银⾏转账案例关键代码
TransferServlet
|
TransferService接⼝及实现类
public interface TransferService { |
AccountDao层接⼝及基于Jdbc的实现类
public interface AccountDao { |
3.5 银⾏转账案例代码问题分析
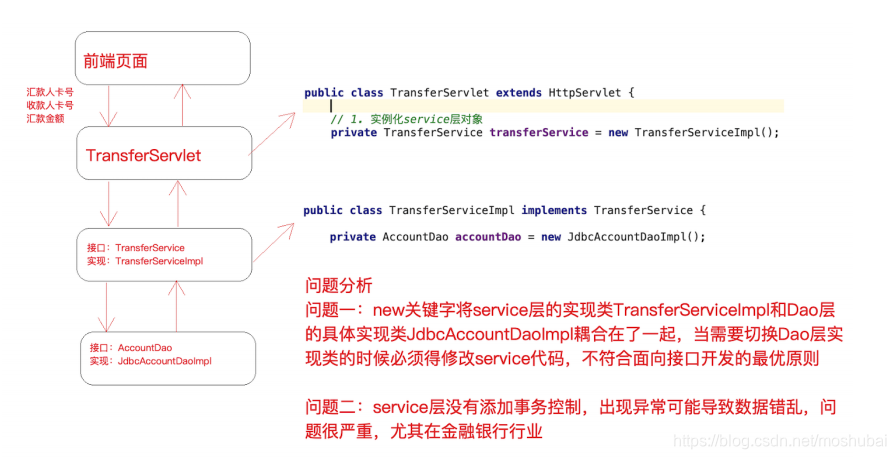
问题⼀:在上述案例实现中, service 层实现类在使⽤ dao 层对象时,直接在TransferServiceImpl 中通过
AccountDao accountDao = new JdbcAccountDaoImpl()获得了 dao 层对象,然⽽⼀个 new 关键字却将TransferServiceImpl 和 dao 层具体的⼀个实现类JdbcAccountDaoImpl耦合在了⼀起,如果说技术架构发⽣⼀些变动, dao 层的实现要使⽤其它技术,⽐如 Mybatis ,思考切换起来的成本?每⼀个 new 的地⽅都需要修改源代码,重新编译,⾯向接⼝开发的意义将⼤打折扣?问题⼆: service 层代码没有竟然还没有进⾏事务控制 ?!如果转账过程中出现异常,将可能导致数据库数据错乱,后果可能会很严重,尤其在⾦融业务。
3.6 问题解决思路
针对问题⼀思考:
实例化对象的⽅式除了 new 之外,还有什么技术?反射 ( 需要把类的全限定类名配置在 xml中 )。
考虑使⽤设计模式中的⼯⼚模式解耦合,另外项⽬中往往有很多对象需要实例化,那就在⼯⼚中使⽤反射技术实例化对象,⼯⼚模式很合适。
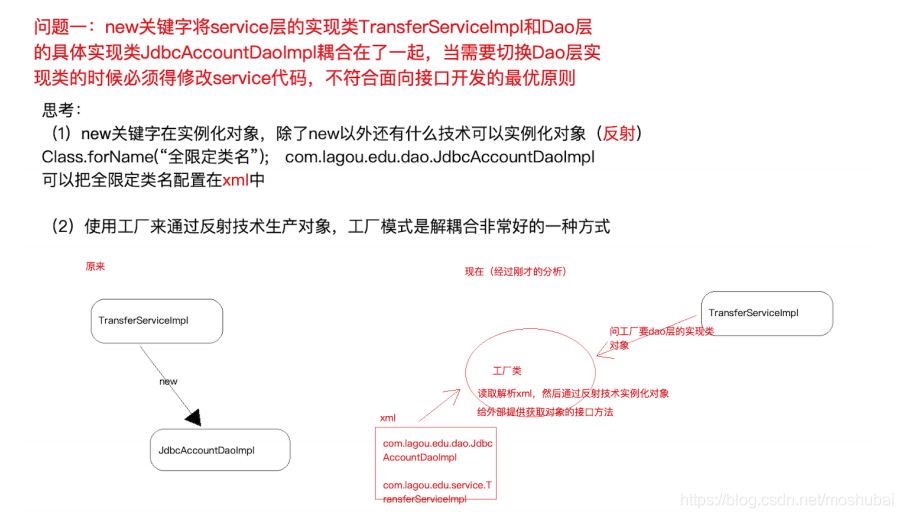
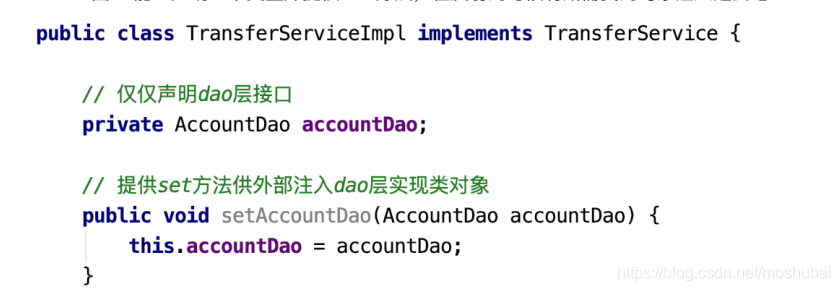
更进⼀步,代码中能否只声明所需实例的接⼝类型,不出现 new 也不出现⼯⼚类的字眼,如下图? 能!声明⼀个变量并提供 set ⽅法,在反射的时候将所需要的对象注⼊进去吧。
针对问题⼆思考:
service 层没有添加事务控制,怎么办?没有事务就添加上事务控制,⼿动控制 JDBC 的Connection 事务,但要注意将 Connection 和当前线程绑定(即保证⼀个线程只有⼀个Connection ,这样操作才针对的是同⼀个 Connection ,进⽽控制的是同⼀个事务)。
3.7 案例代码改造
1. 针对问题⼀的代码改造
beans.xml
<beans>
<bean id="transferService"
class="com.lagou.edu.service.impl.TransferServiceImpl">
<property name="AccountDao" ref="accountDao"></property>
</bean>
<bean id="accountDao"
class="com.lagou.edu.dao.impl.JdbcAccountDaoImpl">
</bean>
</beans>增加 BeanFactory.java
public class BeanFactory {

    /**
     * 任务一:读取解析xml,通过反射技术实例化对象并且存储待用(map集合)
     * 任务二:对外提供获取实例对象的接口(根据id获取)
     */
    private static Map<String, Object> map = new HashMap<>();  // 存储对象

    static {
        // 任务一:读取解析xml,通过反射技术实例化对象并且存储待用(map集合)
        // 加载xml
        InputStream resourceAsStream = BeanFactory.class.getClassLoader().getResourceAsStream("beans.xml");
        // 解析xml
        SAXReader saxReader = new SAXReader();
        try {
            Document document = saxReader.read(resourceAsStream);
            Element rootElement = document.getRootElement();
            List<Element> beanList = rootElement.selectNodes("//bean");
            for (int i = 0; i < beanList.size(); i++) {
                Element element = beanList.get(i);
                // 处理每个bean元素,获取到该元素的id 和 class 属性
                String id = element.attributeValue("id");        // accountDao
                String clazz = element.attributeValue("class");  // com.lagou.edu.dao.impl.JdbcAccountDaoImpl
                // 通过反射技术实例化对象
                Class<?> aClass = Class.forName(clazz);
                Object o = aClass.newInstance();  // 实例化之后的对象
                // 存储到map中待用
                map.put(id, o);
            }

            // 实例化完成之后维护对象的依赖关系,检查哪些对象需要传值进入,根据它的配置,我们传入相应的值
            // 有property子元素的bean就有传值需求
            List<Element> propertyList = rootElement.selectNodes("//property");
            // 解析property,获取父元素
            for (int i = 0; i < propertyList.size(); i++) {
                Element element = propertyList.get(i);   //<property name="AccountDao" ref="accountDao"></property>
                String name = element.attributeValue("name");
                String ref = element.attributeValue("ref");

                // 找到当前需要被处理依赖关系的bean
                Element parent = element.getParent();

                // 调用父元素对象的反射功能
                String parentId = parent.attributeValue("id");
                Object parentObject = map.get(parentId);
                // 遍历父对象中的所有方法,找到"set" + name
                Method[] methods = parentObject.getClass().getMethods();
                for (int j = 0; j < methods.length; j++) {
                    Method method = methods[j];
                    if (method.getName().equalsIgnoreCase("set" + name)) {  // 该方法就是 setAccountDao(AccountDao accountDao)
                        method.invoke(parentObject, map.get(ref));
                    }
                }
                // 把处理之后的parentObject重新放到map中
                map.put(parentId, parentObject);
            }
        } catch (DocumentException e) {
            e.printStackTrace();
        } catch (ClassNotFoundException e) {
            e.printStackTrace();
        } catch (IllegalAccessException e) {
            e.printStackTrace();
        } catch (InstantiationException e) {
            e.printStackTrace();
        } catch (InvocationTargetException e) {
            e.printStackTrace();
        }

    }

    // 任务二:对外提供获取实例对象的接口(根据id获取)
    public static Object getBean(String id) {
        return map.get(id);
    }
}
修改 TransferServlet
public class TransferServlet extends HttpServlet {
// 1. 实例化service层对象
private TransferService transferService = (TransferService) BeanFactory.getBean("transferService");
}修改 TransferServiceImpl
public class TransferServiceImpl implements TransferService {
    // 最佳状态
    private AccountDao accountDao;
    // 构造函数传值/set方法传值
    public void setAccountDao(AccountDao accountDao) {
        this.accountDao = accountDao;
    }
}
2. 针对问题二的改造
- 增加 ConnectionUtils
从当前线程中获取连接,保证使用同一个链接public class ConnectionUtils {
private ThreadLocal<Connection> threadLocal = new ThreadLocal<>(); // 存储当前线程的连接
/**
* 从当前线程获取连接
*/
public Connection getCurrentThreadConn() throws SQLException {
/**
* 判断当前线程中是否已经绑定连接,如果没有绑定,需要从连接池获取一个连接绑定到当前线程
*/
Connection connection = threadLocal.get();
if(connection == null) {
// 从连接池拿连接并绑定到线程
connection = DruidUtils.getInstance().getConnection();
// 绑定到当前线程
threadLocal.set(connection);
}
return connection;
}
}
然后将所有JdbcAccountDaoImpl中的变量修改如下,至此第二个问题第一步改造完成
将// Connection con = DruidUtils.getInstance().getConnection();替换成Connection con = connectionUtils.getCurrentThreadConn();//con.close();注释掉
|
接下来进行第二个问题第二部改造,把事务控制添加在service层
- 增加 TransactionManager 事务管理器类
将所有的事务控制抽取出来,成一个类,这几个类之间都有相互依赖,在bean.xml中管理依赖
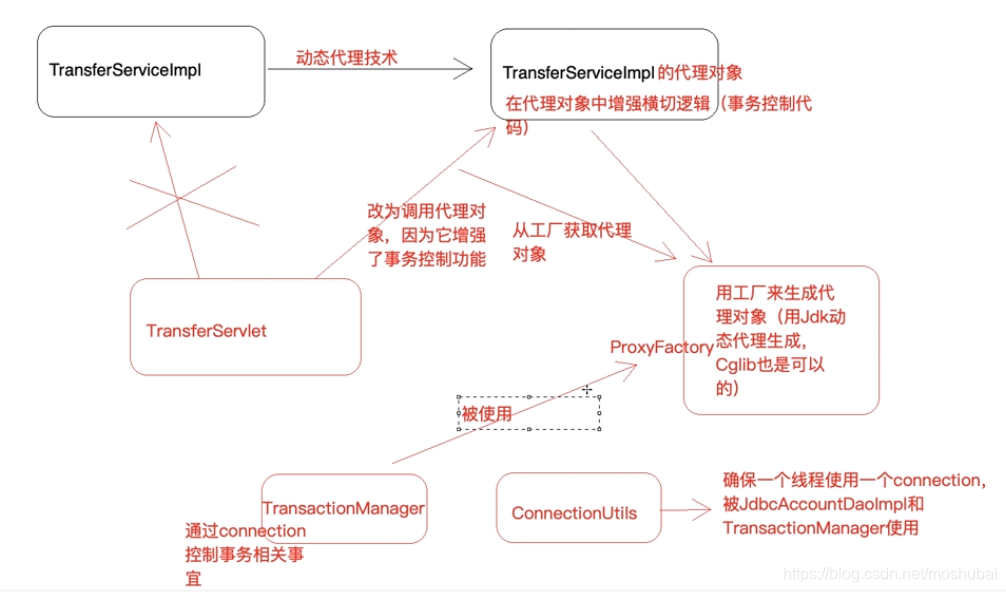
public class TransactionManager { |
增加 ProxyFactory 代理⼯⼚类
public class ProxyFactory {
private TransactionManager transactionManager;
public void setTransactionManager(TransactionManager transactionManager) {
this.transactionManager = transactionManager;
}
public Object getProxy(Object target) {
return Proxy.newProxyInstance(this.getClass().getClassLoader(),
target.getClass().getInterfaces(),
new InvocationHandler() {
public Object invoke(Object proxy, Method method, Object[] args) throws Throwable {
Object result = null;
try{
// 开启事务
transactionManager.beginTransaction();
// 调用原有业务逻辑
result = method.invoke(target,args);
// 提交事务
transactionManager.commit();
}catch(Exception e) {
e.printStackTrace();
// 回滚事务
transactionManager.rollback();
// 异常向上抛出,便于servlet中捕获
throw e.getCause();
}
return result;
}
});
}
}修改 beans.xml
<!--根标签beans,里面配置一个又一个的bean子标签,每一个bean子标签都代表一个类的配置-->
<beans>
<!--id标识对象,class是类的全限定类名-->
<bean id="accountDao" class="com.lagou.edu.dao.impl.JdbcTemplateDaoImpl">
<property name="ConnectionUtils" ref="connectionUtils"/>
</bean>
<bean id="transferService" class="com.lagou.edu.service.impl.TransferServiceImpl">
<!--set+ name 之后锁定到传值的set方法了,通过反射技术可以调用该方法传入对应的值-->
<property name="AccountDao" ref="accountDao"></property>
</bean>
<!--配置新增的三个Bean-->
<bean id="connectionUtils" class="com.lagou.edu.utils.ConnectionUtils"></bean>
<!--事务管理器-->
<bean id="transactionManager" class="com.lagou.edu.utils.TransactionManager">
<property name="ConnectionUtils" ref="connectionUtils"/>
</bean>
<!--代理对象工厂-->
<bean id="proxyFactory" class="com.lagou.edu.factory.ProxyFactory">
<property name="TransactionManager" ref="transactionManager"/>
</bean>
</beans>修改 TransferServlet
public class TransferServlet extends HttpServlet {
// 1. 实例化service层对象
//private TransferService transferService = new TransferServiceImpl();
//private TransferService transferService = (TransferService) BeanFactory.getBean("transferService");
// 首先从BeanFactory获取到proxyFactory代理工厂的实例化对象
private ProxyFactory proxyFactory = (ProxyFactory) BeanFactory.getBean("proxyFactory");
// 从工厂获取委托对象(委托对象是增强了事务控制的功能)
private TransferService transferService = (TransferService) proxyFactory.getJdkProxy(BeanFactory.getBean("transferService")) ;
protected void doGet(HttpServletRequest req, HttpServletResponse resp) throws ServletException, IOException {
doPost(req,resp);
}
protected void doPost(HttpServletRequest req, HttpServletResponse resp) throws ServletException, IOException {
// 设置请求体的字符编码
req.setCharacterEncoding("UTF-8");
String fromCardNo = req.getParameter("fromCardNo");
String toCardNo = req.getParameter("toCardNo");
String moneyStr = req.getParameter("money");
int money = Integer.parseInt(moneyStr);
Result result = new Result();
try {
// 2. 调用service层方法
transferService.transfer(fromCardNo,toCardNo,money);
result.setStatus("200");
} catch (Exception e) {
e.printStackTrace();
result.setStatus("201");
result.setMessage(e.toString());
}
// 响应
resp.setContentType("application/json;charset=utf-8");
resp.getWriter().print(JsonUtils.object2Json(result));
}
}
测试之后,转账失败,数据库回滚,数据并没有被修改,添加事务管理成功。